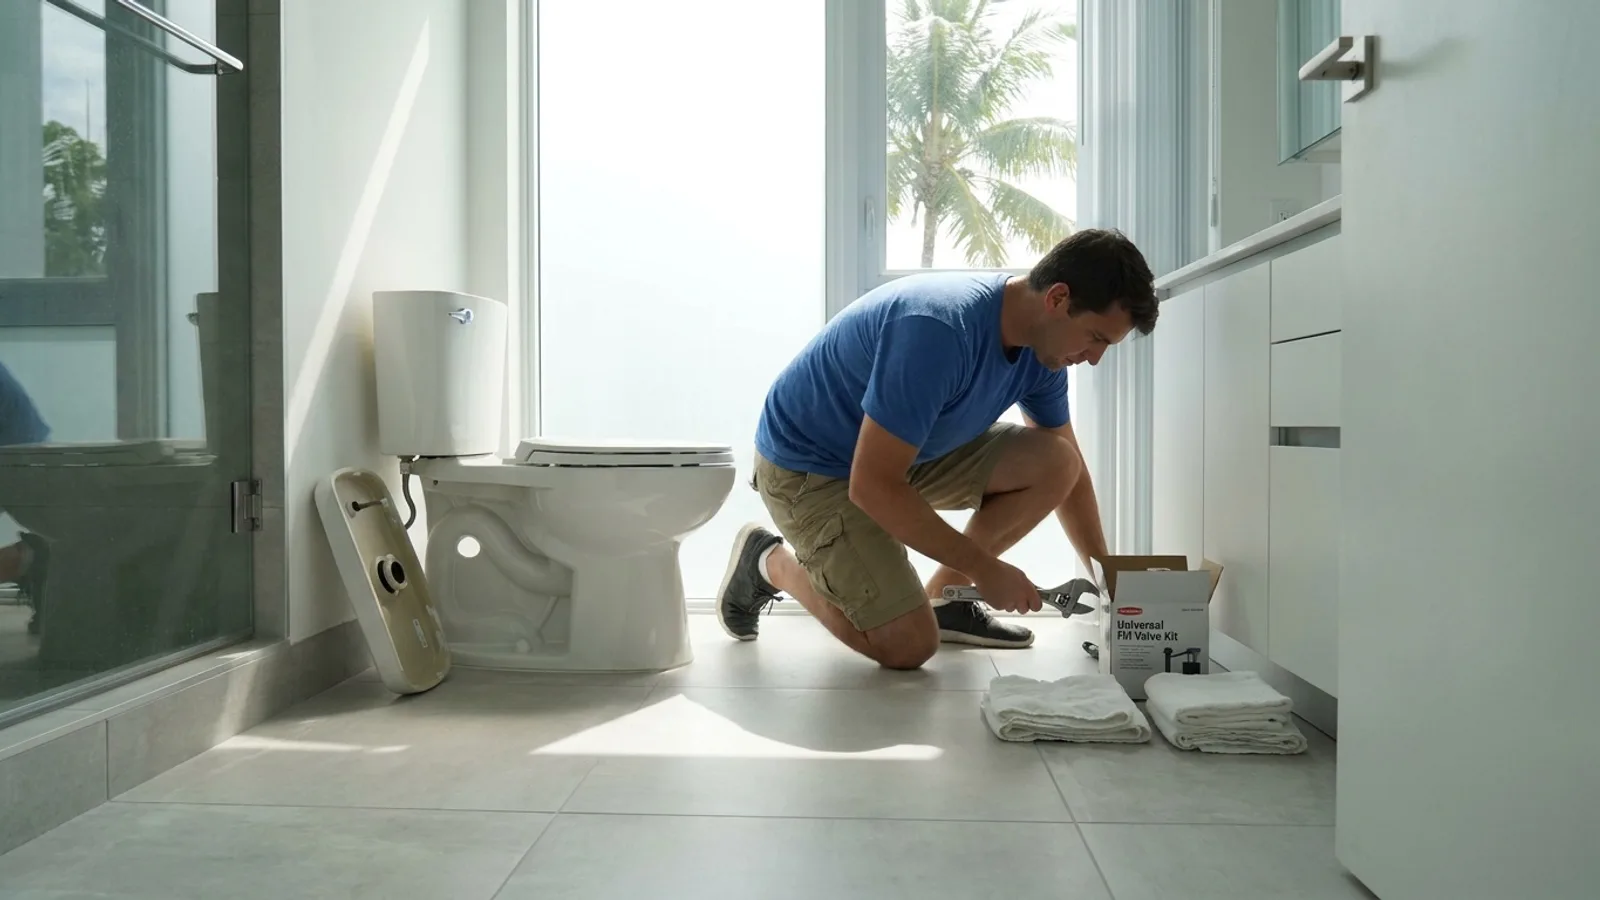
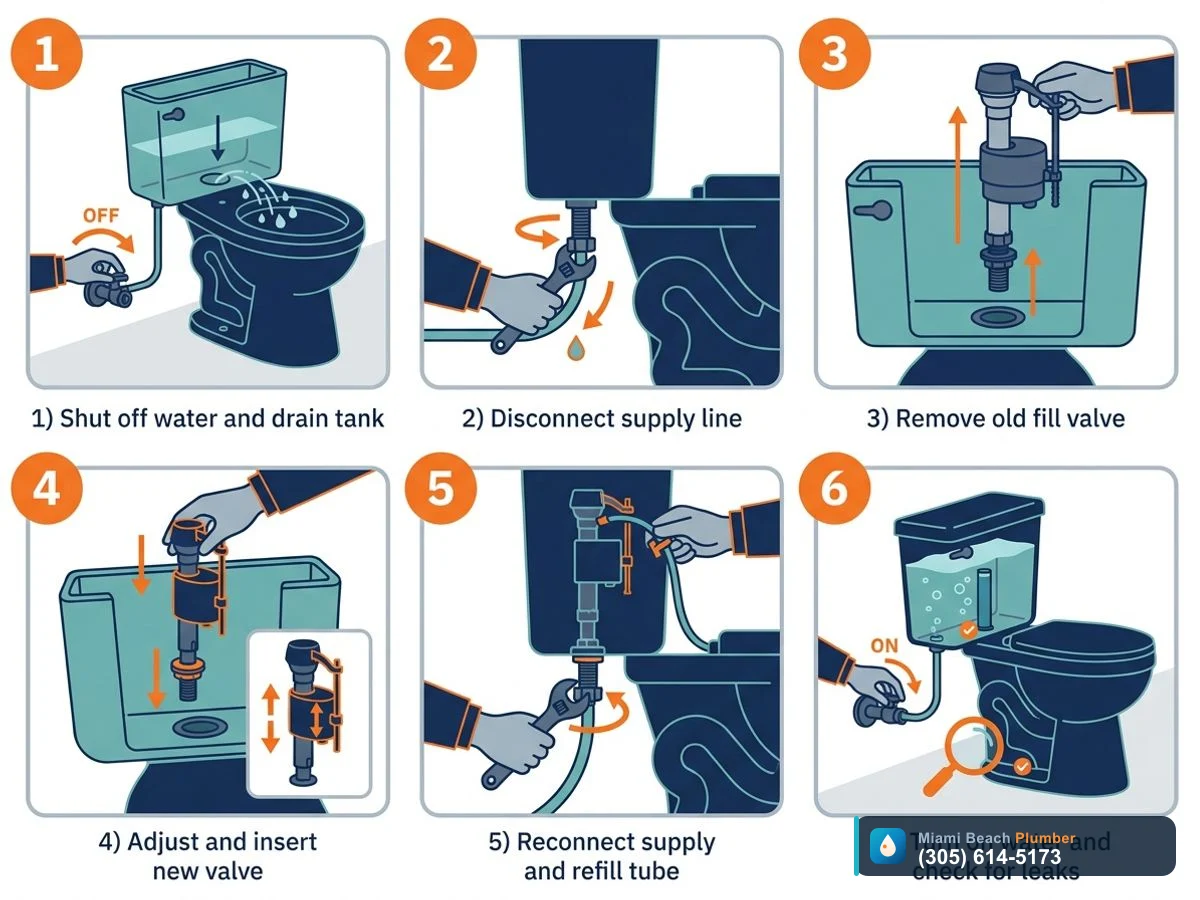
To replace a toilet fill valve, shut off the water, drain the tank, disconnect the supply line, remove the old valve from the tank bottom, install and height-adjust the new valve with its rubber gasket, reconnect the water line, then turn the water on and adjust the fill level. Always check for leaks.
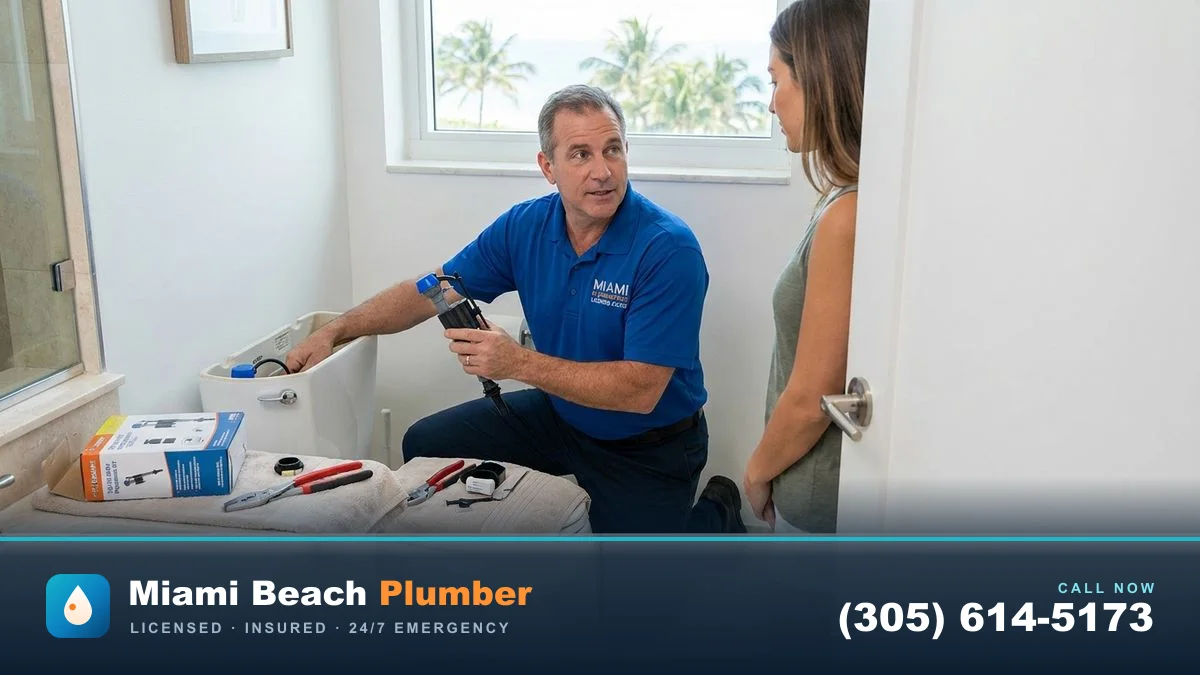
If your toilet keeps running or hissing and you are tired of jiggling the handle, the fill valve is usually the problem. The good news is that toilet fill valve replacement is a safe DIY job for most Miami homeowners with basic tools.
How to tell if your toilet fill valve is the problem
Before you grab a wrench, you want to be sure the fill valve is actually causing the problem. In Miami and Miami Beach, hard water around 180 to 210 ppm and mineral buildup are tough on plastic and rubber parts inside toilet tanks. That is why we see so many fill valve failures in condos, hotels, and older single-family homes.
Here are the most common symptoms that point to a bad fill valve rather than a flapper or other part:
- Toilet keeps running fill valve sound: a constant hissing or trickling sound from the left side of the tank, even when you have not just flushed.
- Water level too high or too low: the tank either overfills into the overflow tube or never reaches the marked water line, so the flush is weak.
- Water spraying or sputtering inside the tank: you see tiny jets or spray from the top of the valve instead of a smooth, controlled flow.
- Fill stops and starts by itself: the toilet refills for a few seconds every few minutes, even though nobody used it. This can be a combination of a slow flapper leak and a sensitive fill valve.
To separate a flapper issue from a fill valve problem, do a quick test:
- Turn off the shutoff valve to the toilet.
- Wait 30 minutes and listen. If the running sound stops instantly when you close the shutoff, you are dealing with a water supply or fill valve issue.
- If the bowl water level drops or the tank empties slowly even with the water off, you also have a flapper or flush valve leak.
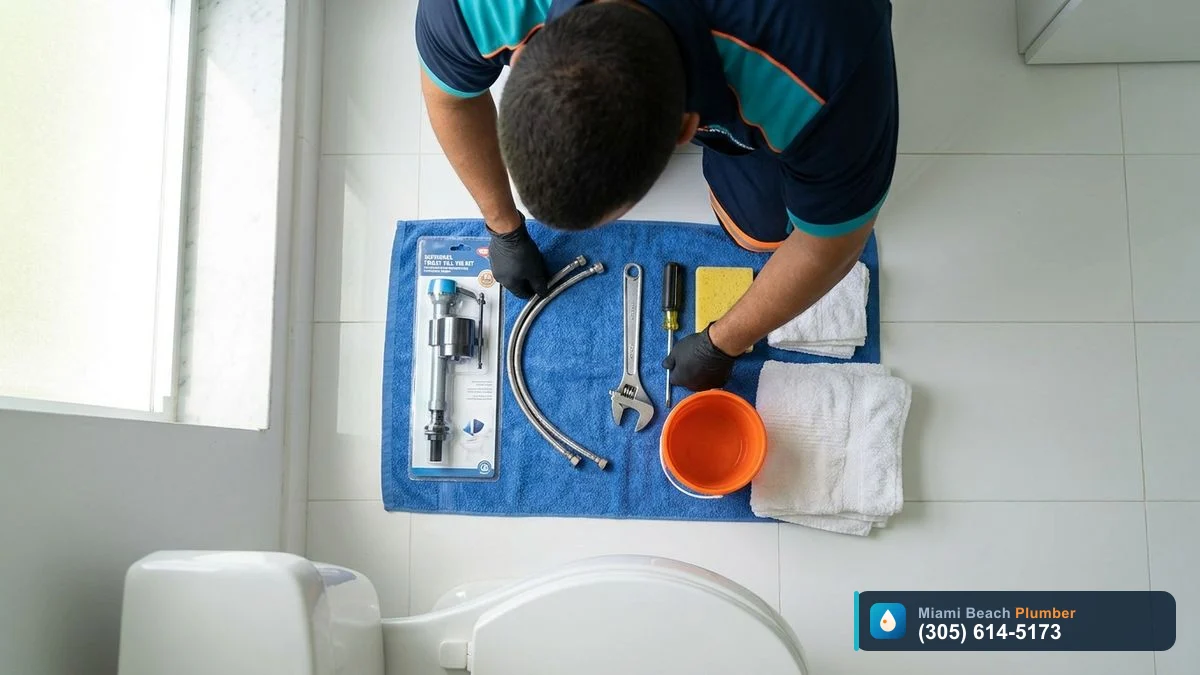
Tools, parts and prep before toilet fill valve replacement
Once you are confident the fill valve is the culprit, get your tools and parts together. Replacing a toilet fill valve is not complicated, but having everything nearby keeps you from dripping water across your Miami condo or tile floors.
Basic tools and materials:
- Adjustable wrench or small channel-lock pliers
- Flathead screwdriver (sometimes Phillips too)
- Buckets or a small container
- Old towels or rags
- Sponge or shop vac (for the last bit of water in the tank)
- New toilet fill valve kit (universal type fits most toilets)
- Replacement supply line if the old one looks corroded or brittle
Most modern universal fill valves work in Miami homes and condos, including high-efficiency toilets. The key is adjusting the height correctly so the valve matches your tank depth and the overflow tube height.
| Item | Purpose | Notes for Miami / Miami Beach |
|---|---|---|
| Universal fill valve kit | Replaces old valve and seals | Choose a corrosion-resistant model, salt air near the beach can shorten life. |
| Flexible supply line | Connects shutoff to fill valve | Consider stainless braided lines, they hold up better in humid environments. |
| Adjustable wrench | Loosens connection under tank | Hand tighten where possible to avoid cracking tank porcelain. |
| Towels and bucket | Catch and control water | Important in condos to avoid drips to units below. |
Clear the space around the toilet, remove bath mats, and give yourself wiggle room. In tight Miami Beach condo bathrooms, you may need to turn at an angle to reach under the tank comfortably. A small flashlight or headlamp can help you see the nut under the tank clearly.
Step by step how to replace a toilet fill valve
This is the core process. If you can handle basic hand tools and are comfortable reaching behind the toilet, you can usually handle toilet fill valve replacement yourself. Expect about 30 to 60 minutes for your first time, less once you have done a few.
1. Shut off the water and drain the tank
- Turn the shutoff valve clockwise until it stops. Do not force it past resistance.
- Flush the toilet and hold the handle down to let as much water out as possible.
- Use a sponge or small container to remove the remaining water from the tank into a bucket.
2. Disconnect the water supply line
- Place a towel or small container under the tank where the supply line connects.
- Use your wrench to loosen the nut that holds the supply line to the bottom of the fill valve shank.
- Carefully spin the nut off by hand and lower the supply line out of the way.
3. Remove the old fill valve
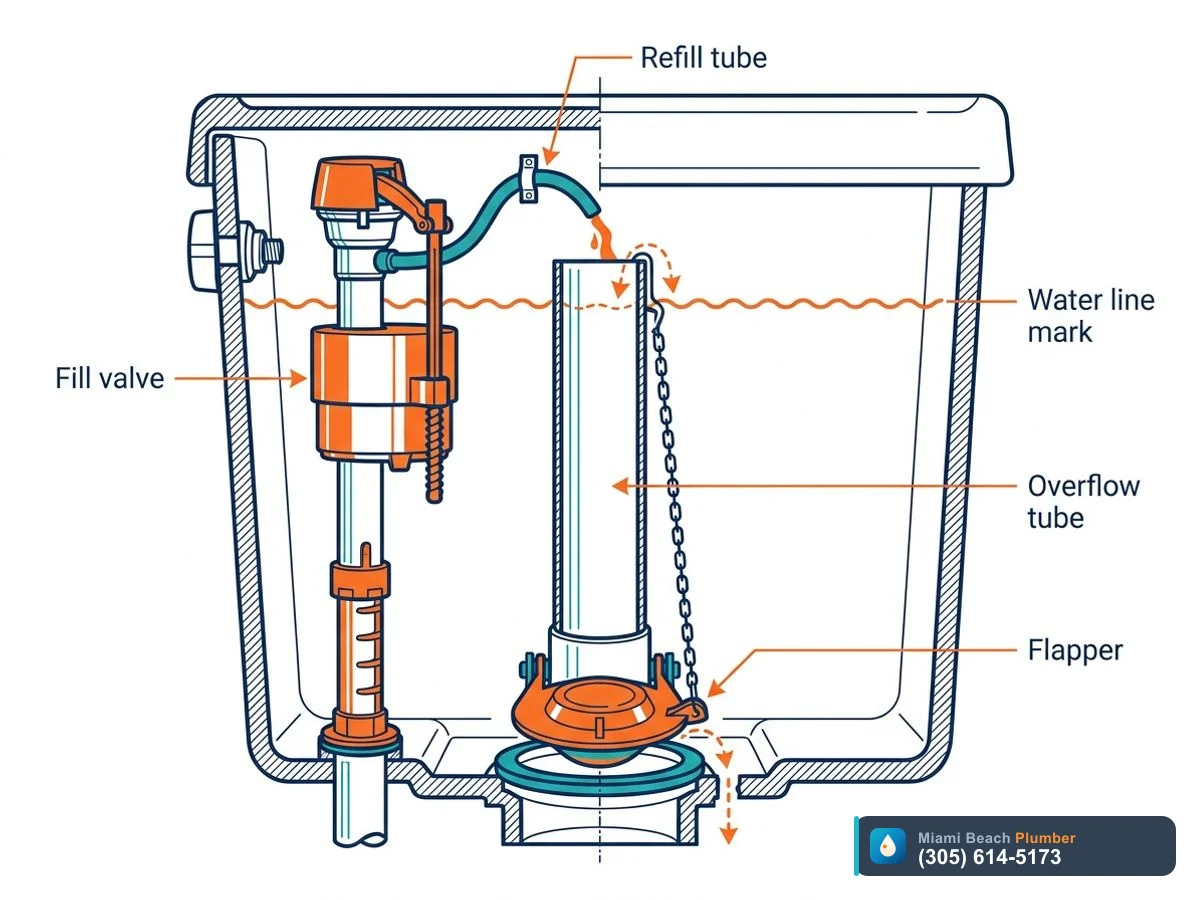
- Inside the tank, disconnect the small refill tube that runs from the fill valve to the overflow tube.
- Under the tank, loosen the large plastic nut that holds the fill valve to the tank bottom. Turn counterclockwise.
- Lift the entire old fill valve straight up and out of the tank.
- Remove any old rubber gasket or debris around the hole in the tank bottom.
4. Prepare and adjust the new fill valve
- Slide the new rubber gasket onto the threaded shank of the new valve as the instructions show.
- Most modern valves have a telescoping body. Adjust the height so the top of the valve is about 1 inch above the overflow tube, or as the manufacturer recommends.
- Double check height, this is key for proper filling and preventing overflows.
5. Install the new fill valve in the tank
- Insert the valve into the hole in the tank bottom with the float and arm clear of the tank wall.
- From under the tank, hand thread the large mounting nut onto the valve shank.
- Hold the valve straight and snug the nut by hand, then give it a gentle extra turn with your wrench. Do not overtighten, you can crack the porcelain.
6. Reconnect the supply line and refill tube
- Reattach or replace the flexible supply line to the bottom of the valve. Hand tighten, then a small extra turn with the wrench if needed.
- Inside the tank, connect the small refill tube from the valve outlet to the overflow tube with the clip provided. The tube should point into the overflow, not stick up above it.
7. Turn water back on and test
- Slowly open the shutoff valve counterclockwise.
- Watch the tank fill and inspect under the tank for any leaks.
- Adjust the fill level using the screw or sliding clip on the valve so the water stops at the marked "water line" in the tank or about 1 inch below the top of the overflow tube.
- Flush several times to confirm smooth operation and a strong flush.
How to fix a running toilet fill valve without replacing it
Sometimes a toilet keeps running, but the fill valve is not completely shot. In Miami-Dade's hard water, mineral grit can lodge in the valve and cause it to leak or hiss. Before you commit to buying a new valve, you can try a few quick fixes.
1. Adjust the fill height and float
- Open the tank lid and find the adjustment screw or clip on the fill valve.
- Turn the screw or slide the clip to lower the float if water is overflowing into the overflow tube.
- Flush a few times to see if the water now stops at the correct level.
2. Flush debris out of the valve
- Turn off the shutoff valve at the wall.
- Remove the top cap of the fill valve as the manufacturer shows, usually by twisting and lifting.
- Hold a cup over the open valve body.
- Briefly turn the water back on to blast out any grit or debris into the cup.
- Turn water off, reassemble the top of the valve, and test again.
3. Check the refill tube position
- Make sure the small refill tube is clipped to the overflow tube and not shoved down inside it.
- If the tube is too far into the overflow, it can siphon water and cause ghost flushing.
If you see signs of sediment in the tank or notice rusty or cloudy water, consider having your water lines inspected. Miami Beach Plumber can help with leak detection and diagnosing stubborn water quality issues that keep affecting toilet parts.
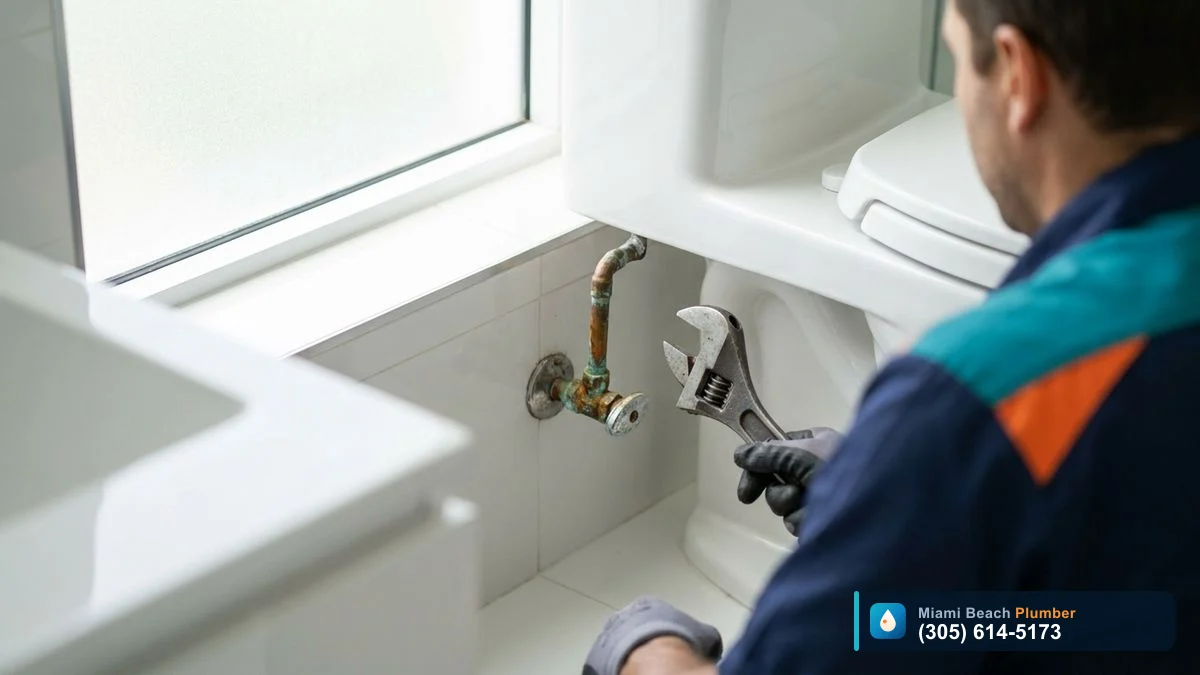
Dealing with stuck shutoff valves and corroded parts in Miami homes
In older Miami and Miami Beach properties, especially 1960s to 1980s condos and homes, the hardest part of changing a toilet fill valve is not the valve itself. It is the shutoff valve at the wall or the old metal supply line that has fused in place over decades.
Common problems you might run into:
- Shutoff valve will not turn or only turns part way.
- Water seeps from the valve stem when you try to move it.
- Green or white corrosion on copper or brass fittings near the wall.
- Rigid chrome supply line that bends or kinks when you try to remove it.
If the shutoff valve is only slightly stiff but not leaking, you can gently work it back and forth and add a little lubricant to the stem. Once it moves freely and is not leaking, you can proceed with the toilet fill valve replacement.
When reconnecting, many Miami-Dade plumbers now prefer flexible stainless braided supply lines instead of rigid chrome tubing. They handle small movements better in buildings that experience vibrations, and they are easier to remove next time you fix a running toilet fill valve or do other toilet repairs.
How long should a toilet fill valve last in Miami and when to call a pro
In a perfect world, a good quality fill valve might last 10 years or more. In Miami, with hard water, high humidity, and sometimes sandy grit getting into the lines during water work, we often see valves need replacement sooner, especially in busy homes, restaurants, and hotels.
Typical lifespan and replacement cues:
- 5 to 8 years is a common real-world range for a modern plastic fill valve in Miami-Dade.
- If you have already cleaned and adjusted the valve once and the toilet keeps running again a few months later, it is probably time to replace it.
- Visible cracks, warped plastic, or a float that sticks or rubs the tank wall are clear signs the valve is done.
There are also situations where a running toilet is a clue to a bigger problem, and bringing in a licensed and insured plumber is smart:
- You have multiple toilets or fixtures acting up together, which can point to pressure issues or a main supply problem.
- You see moisture or staining around the toilet base, which can indicate a wax ring leak or slab leak, especially in ground-floor units.
- Your water bill suddenly spikes and you cannot find the source. A running toilet plus a hidden leak is common in older Miami-Dade homes.
Miami Beach Plumber spends a lot of time combining small repairs like toilet fill valve replacement with bigger-picture services like leak detection and drain cleaning, especially for property managers responsible for multiple units. It is often more efficient to address a few related plumbing issues in one visit instead of chasing them one by one.
Preventing future toilet fill valve problems in Miami-Dade homes and condos
Once you have put in the effort to change a toilet fill valve and fix a running toilet, it makes sense to keep things working smoothly as long as possible. A little maintenance goes a long way in Miami’s climate.
Simple habits that protect your new fill valve:
- Open and close the shutoff valve twice a year so it does not freeze in place. Hurricane season prep is a good reminder.
- Lift the tank lid annually and check for mineral buildup, stuck floats, and correct water level.
- Avoid drop-in tank tablets that sit in the tank water. They can eat rubber parts and shorten the life of both the flapper and fill valve. Use bowl cleaner in the bowl only.
- Address discolored or sandy water soon. That grit chews up valve seats and small passages inside fill valves.
For Miami Beach oceanfront buildings and properties close to the bay, salt air and constant humidity are tougher on exposed metal parts, including shutoffs and supply lines. Upgrading to better quality parts and replacing old chrome-plated steel with brass or stainless materials during toilet fill valve replacement can prevent future headaches.
If you manage multiple units in Miami-Dade, it can be smart to standardize on one or two brands of toilets and fill valves. That way, you keep a couple of universal fill valves and supply lines in your maintenance closet. The next time a tenant reports that a toilet keeps running, you or your maintenance tech can fix the running toilet fill valve quickly with familiar parts and a simple checklist.
How to replace a toilet fill valve safely at home
- Shut off water and empty the tank. Turn the shutoff valve clockwise until it stops, flush the toilet, hold the handle to drain as much water as possible, then sponge out the remaining water into a bucket.
- Disconnect the water supply line. Place a towel or bowl under the tank, loosen the nut on the bottom of the fill valve with a wrench, and gently pull the supply line free.
- Remove the old fill valve. Unclip the refill tube inside the tank, loosen the large plastic nut under the tank that holds the valve, then lift the old valve and gasket out of the tank.
- Adjust and install the new fill valve. Set the new valve height so the top is about 1 inch above the overflow tube, slide the gasket on, insert it through the tank hole, and hand tighten the mounting nut, then snug gently with a wrench.
- Reconnect the supply line and refill tube. Attach the water supply line to the valve’s bottom shank and hand tighten, then connect the small refill tube from the valve to the overflow tube inside the tank.
- Turn water on and adjust the fill level. Slowly open the shutoff valve, watch for leaks under the tank, then adjust the fill valve’s screw or clip so the water stops at the marked water line or about 1 inch below the overflow tube.
- Test flushes and final leak check. Flush several times, confirm the toilet no longer runs, and feel all connections under the tank for moisture. Tighten slightly if needed without overtightening.
If any step involves gas, electrical wiring, sewage or opening a wall, stop and call a licensed pro at (305) 614-5173.