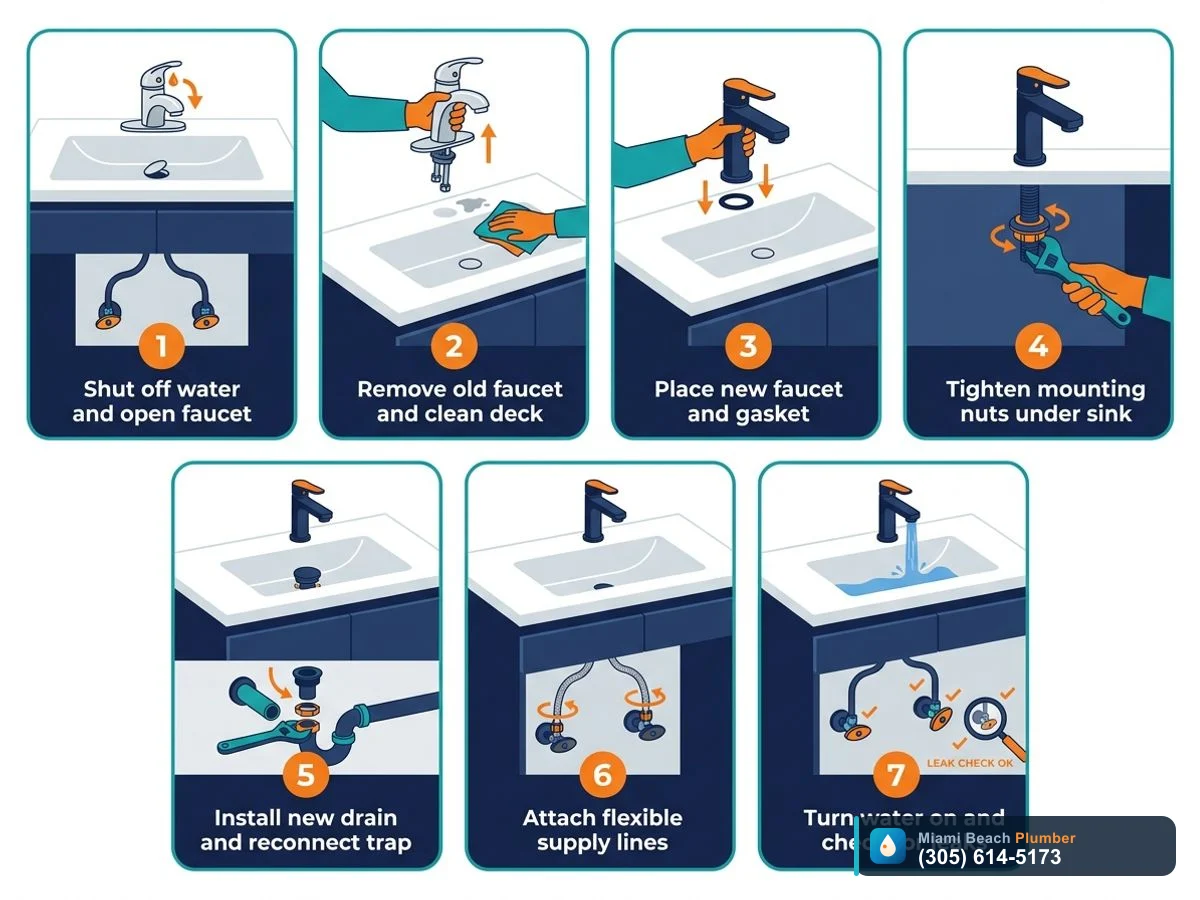
Turn off the water, disconnect the supply lines, loosen the old faucet and drain, clean the sink, then set the new faucet and drain with the included gasket or plumber’s putty. Tighten from below, reconnect supply lines, turn water back on, and check carefully for leaks.
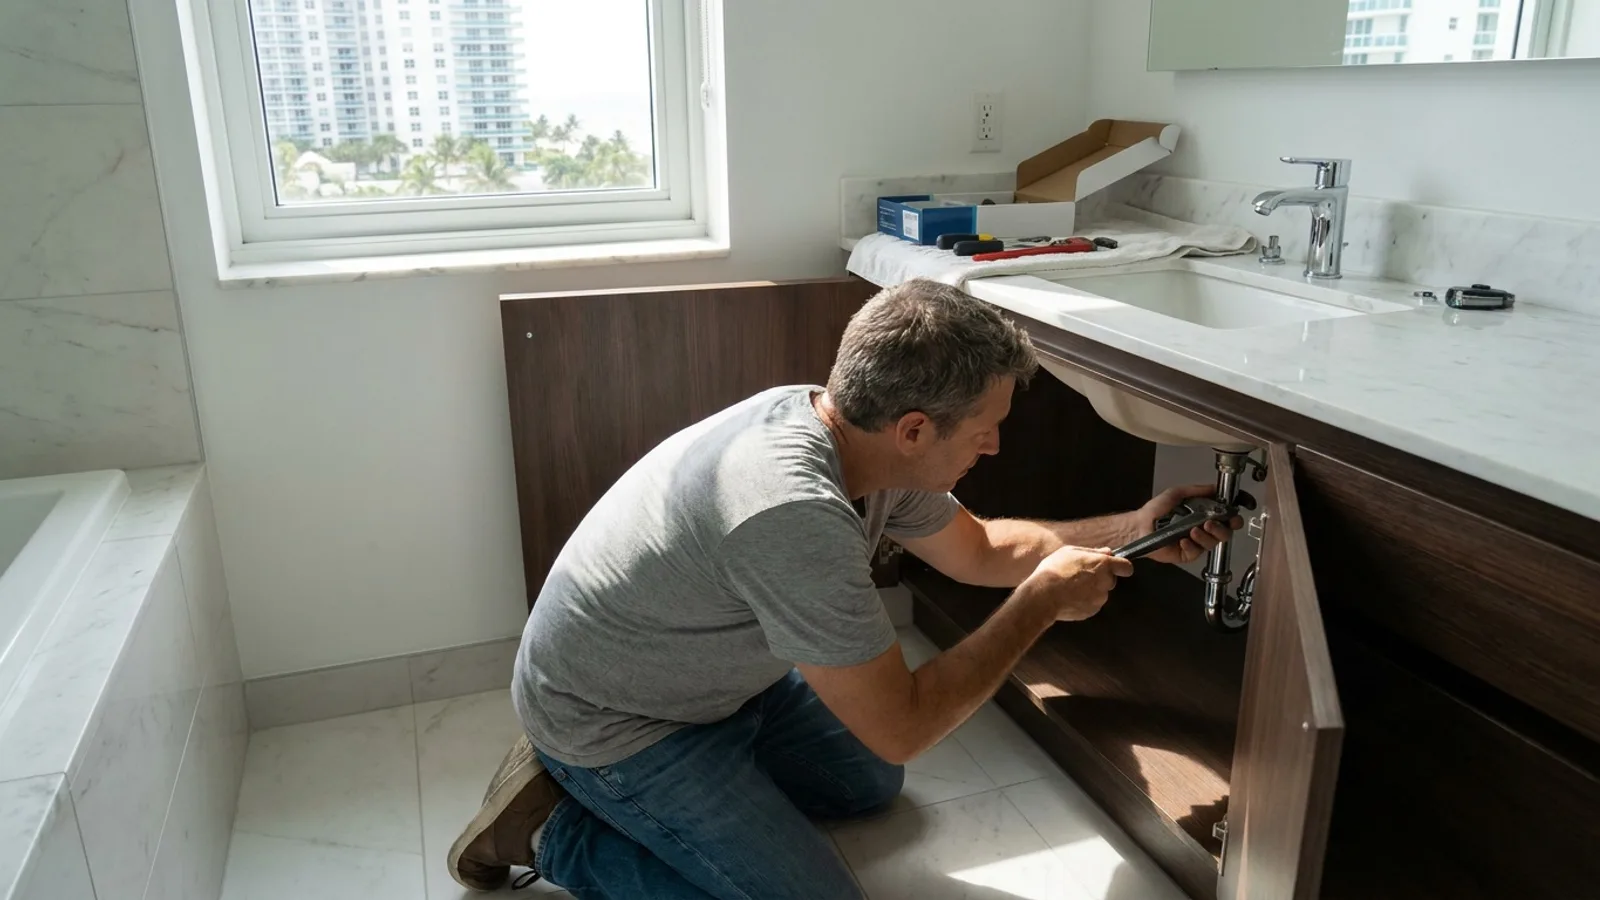
Dripping handle, rusty base, or a bathroom faucet so old it never really gets clean anymore. If you are ready to replace a bathroom faucet yourself, the good news is that it is one of the more realistic plumbing DIY projects, as long as you plan it out and stay patient.

Know if your bathroom faucet installation is safe to DIY
Before you buy a shiny new faucet, you need to know if this is a realistic bathroom faucet installation DIY project for your situation. In many Miami and Miami Beach condos, space is tight inside the vanity and older plumbing can be corroded from years of humidity, hard water, and salt air.
Most standard faucet swaps are safe for capable DIYers. You are usually working with low-pressure water lines under a sink and simple mechanical parts. The main risks are water damage to cabinets or downstairs neighbors, especially in high-rise Miami-Dade condos, and getting stuck because of rusted or frozen fittings.
It is also smart to check with your HOA or property manager in Miami or Miami Beach. Some associations require licensed and insured plumbers for any work that touches building plumbing, especially in high-rises and older buildings with cast iron or copper stacks.
Choose the right replacement faucet for your sink
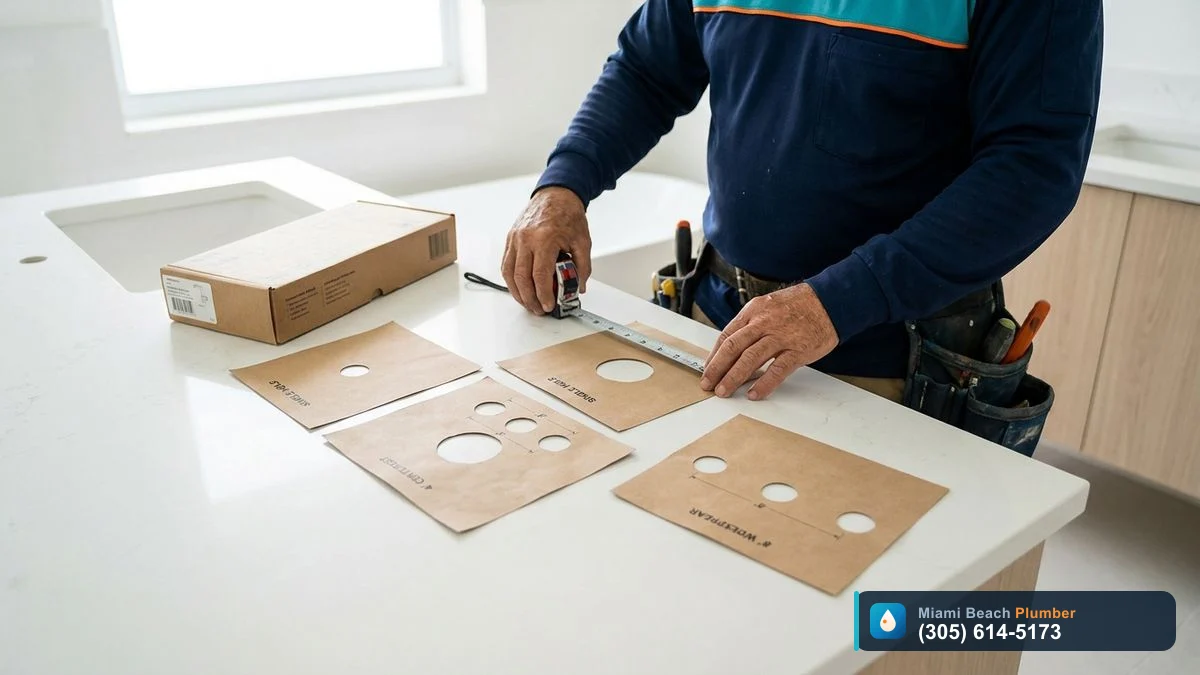
Walking into a Miami home center and grabbing the first faucet that catches your eye is an easy way to end up making two or three trips. To replace a bathroom faucet without headaches, match the faucet to your existing sink and plumbing.
Start with the mounting style. Most bathroom sinks in Miami-Dade fall into three main categories, and getting this wrong means the faucet simply will not fit.
| Sink hole pattern | What it looks like | Compatible faucet type |
|---|---|---|
| Single-hole | One hole in the sink or countertop | Single-handle faucet (can use deck plate to cover extra holes) |
| 4 inch centerset (most common) | Three holes close together, about 4 inches apart | Centerset faucet or single-handle with deck plate |
| 8 inch widespread | Three holes spaced farther apart, usually 8 inches | Widespread faucet (separate hot and cold handles) |
Measure between the center of the left and right holes to know if you have 4 inch or 8 inch spacing. Also check whether your existing faucet uses a pop-up drain with a lift rod or a pull-up / push-down drain. In Miami’s humid climate, metal finishes like brushed nickel and chrome tend to show fewer water spots from hard water, which commonly tests around 180 to 210 ppm here.
Tools, materials, and Miami-specific prep
A smooth bathroom faucet installation starts with the right tools laid out before you crawl under the vanity. Tight spaces, corrosion, and older shutoff valves in Miami homes can turn a 30 minute job into a long afternoon if you are not prepared.
Here is a practical list for how to install a bathroom sink faucet with minimal surprises:
- Adjustable wrench (or two) for supply lines
- Basin wrench for hard-to-reach mounting nuts
- Channel-lock pliers
- Bucket or shallow pan and towels
- Putty knife or plastic scraper
- Plumber’s putty or 100% silicone (follow faucet instructions)
- Pipe thread tape (Teflon tape) for threaded connections as required
- Flashlight or headlamp
- Cleaning supplies (vinegar, sponge, rag) to clean old gunk from the sink deck
- New faucet and drain assembly with gaskets and hardware
- New flexible supply lines if the old ones are more than 5 to 7 years old
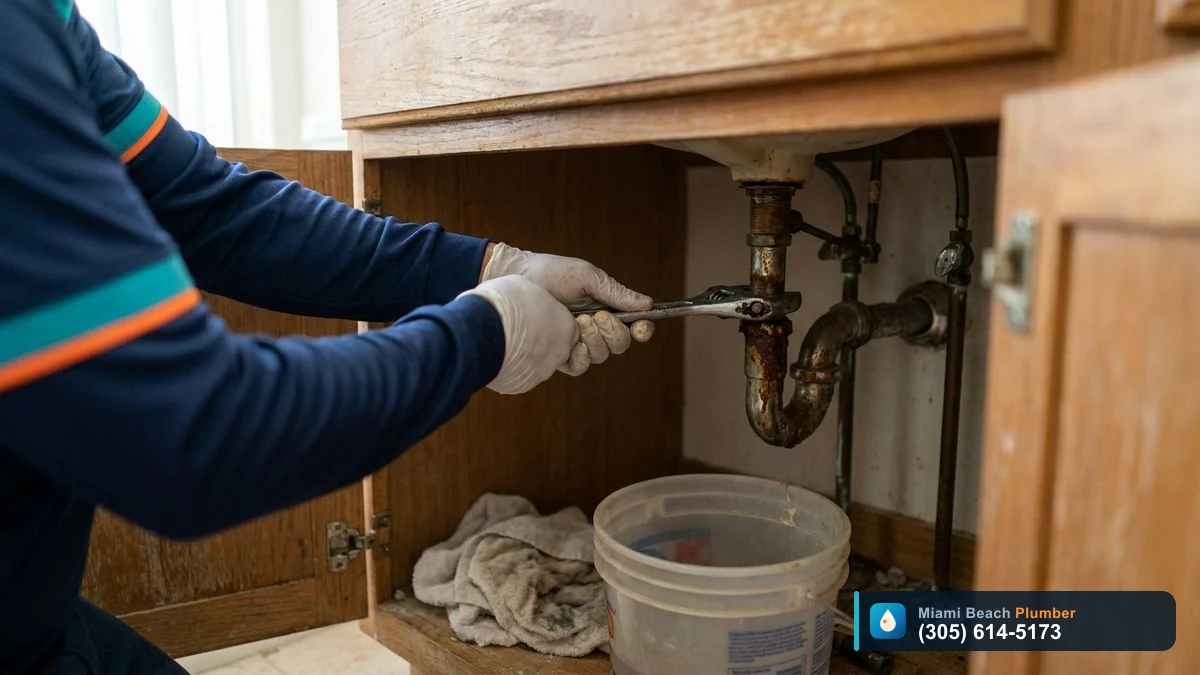
Miami’s climate adds a few extra considerations. High humidity and salt air near the beach can corrode metal nuts and make shutoff valves stiff. It helps to keep penetrating oil on hand and to take your time loosening connections. On older homes in Miami-Dade with original copper or galvanized plumbing, fittings may be fragile, so avoid aggressive force or over-tightening.
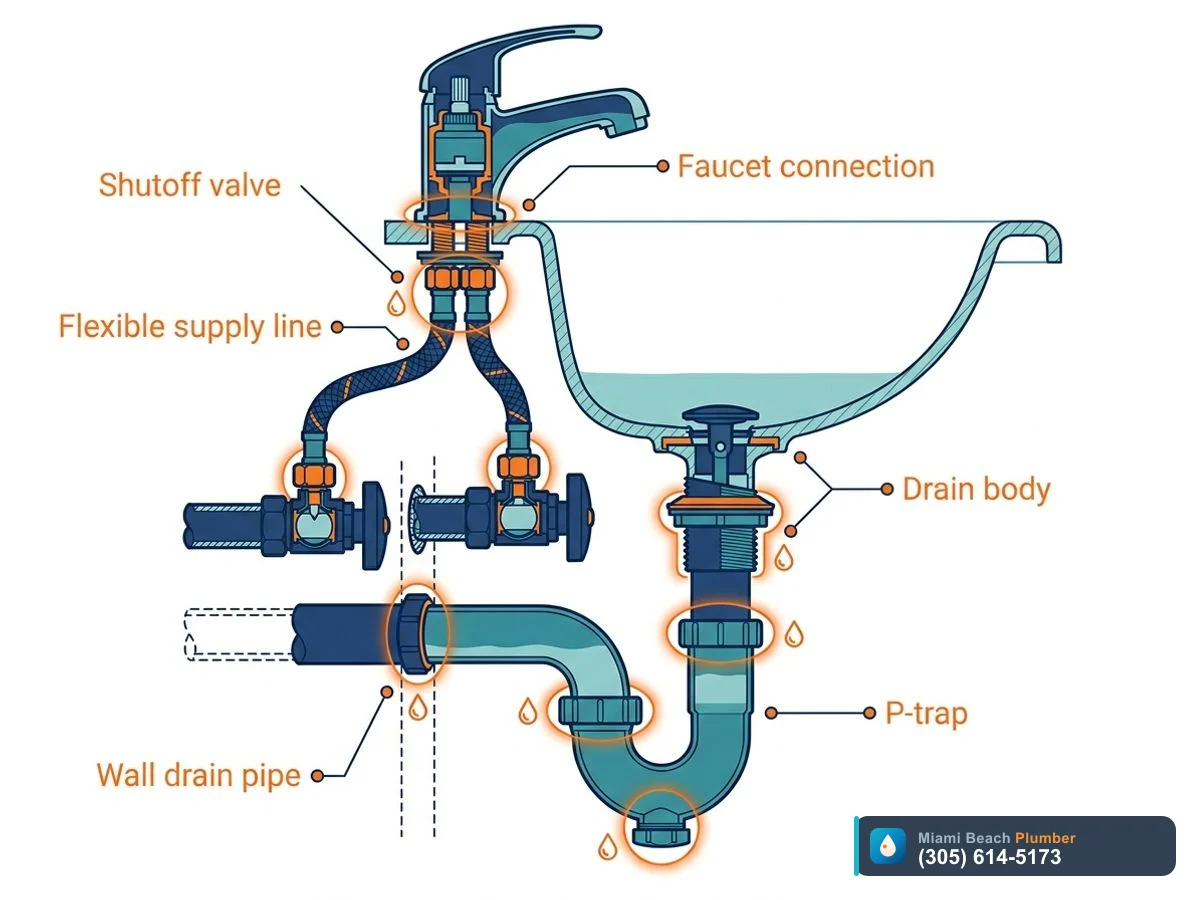
How to remove the old bathroom faucet cleanly
To install a bathroom faucet, you first have to get the old one out without cracking the sink, snapping a supply line, or soaking the vanity. This is where most people run into trouble, especially in older Miami Beach condos with tight, shallow cabinets.
Follow this sequence to remove the old faucet:
- Shut off the water. Turn the hot and cold shutoff valves clockwise until they stop. Open the faucet to relieve pressure and confirm water is off.
- Place a bucket and towels under the faucet. A small amount of water will drain from the lines when you disconnect them.
- Disconnect the supply lines. Use an adjustable wrench to loosen the nuts that connect the flexible lines to the shutoff valves. If they are stiff, hold the valve body with pliers so you do not twist the pipe in the wall.
- Disconnect the drain assembly (if replacing it). Loosen the nut on the P-trap and move it aside, then loosen the large nut that holds the drain to the sink. Disconnect the lift rod and linkage.
- Remove the faucet mounting nuts. From underneath, use a basin wrench to loosen the mounting nuts that hold the faucet to the sink or countertop.
- Lift out the old faucet and drain. From above, pull the faucet free. You may need to carefully cut through old silicone or putty with a putty knife.
Once the faucet and drain are out, scrape away old caulk and plumber’s putty from around the faucet holes and drain opening. Clean the surface thoroughly so the new faucet sits flat and seals properly. This step makes a big difference in preventing leaks, especially in wood vanities that can swell in Miami’s humidity.
Step-by-step: how to install a bathroom sink faucet
With the old parts removed and the sink cleaned up, you are ready to install the new faucet. Take a minute to read the manufacturer’s instructions that came with your faucet. Some brands want plumber’s putty under the base, others use only a rubber gasket, especially on delicate stone tops.
Here is a clear sequence for how to change a bathroom faucet in most standard setups:
- Step 1: Dry fit the faucet. From above, place the faucet on the sink or countertop with any included gasket or deck plate. Make sure it covers the existing holes and sits level.
- Step 2: Apply sealant if required. If the instructions call for plumber’s putty, roll a thin rope and place it around the base or drain flange. For some stone tops in Miami condos, manufacturers prefer 100% silicone instead of putty.
- Step 3: Secure the faucet from below. Thread the mounting nuts or brackets onto the faucet shanks from underneath. Snug them by hand first, then tighten with a basin wrench until the faucet feels solid. Do not overtighten.
- Step 4: Install the drain assembly. From above, insert the new drain body with its gasket or sealant. From below, align the drain so the opening for the lift rod faces the back, then tighten the large drain nut. Reattach the P-trap loosely so you can adjust later.
- Step 5: Connect the lift rod. Assemble the pivot rod, clip, and lift rod so the stopper opens and closes smoothly. Test from above before tightening everything fully.
- Step 6: Attach new supply lines. If your faucet did not come with built-in lines, screw the new flexible supply hoses to the faucet shanks, then connect them to the shutoff valves. Hand tighten first, then snug with a wrench. Do not cross-thread.
Before turning the water back on, double check that all nuts are snug, the drain is centered, and the stopper operates correctly. This is much easier to fix now than after the vanity is full of cleaners and toiletries again.
Turn water back on, test for leaks, and dial it in
Many DIY faucet installs go wrong in the last five minutes. Rushing the final checks is how you end up with a slow drip that ruins a vanity or stains the ceiling below, which is a serious concern in Miami Beach high-rises and older Miami-Dade duplexes.
Follow this specific order to test your work:
- Step 1: Open shutoff valves slowly. Turn the hot and cold valves counterclockwise just a bit, then look and feel around each connection for moisture. If it stays dry, open them fully.
- Step 2: Run the faucet. Turn the faucet on cold, then hot. Let it run for 30 to 60 seconds. Watch under the sink while the water runs, and again for a few minutes after you turn it off.
- Step 3: Check the drain. Fill the sink halfway, close the stopper, then release it. Look for any leaks at the drain body, trap connections, and where the trap meets the wall pipe.
- Step 4: Tighten small seeps. If you see a small drip at a threaded connection, gently tighten one quarter turn and recheck. If a leak continues after careful tightening, you may need to redo that joint, add thread tape, or reseat a gasket.
Once everything is dry, wipe down the faucet and sink, clear tools and rags, and keep an eye on the area over the next 24 hours. It is smart to open the cabinet the next morning and feel around each fitting again, especially in older buildings or during humid summer months when small leaks can hide in condensation.
When to call a licensed plumber in Miami-Dade instead
Bathroom faucet installation DIY is realistic for many homeowners and condo owners, but some situations in Miami, Miami Beach, and across Miami-Dade call for a pro. The cost of a service visit is usually far less than repairing swollen cabinets, mold, or damage to a downstairs neighbor.
You should bring in a licensed plumber if you run into any of these issues while trying to install or replace a bathroom faucet:
- Shutoff valves that will not close fully or start leaking around the stem
- Severely corroded or green/white crusted copper pipes under the sink
- Galvanized or cast iron piping that looks rusted, flaking, or fragile
- Active leaks in the wall behind the vanity or signs of water damage
- Repeated leaks at the drain or trap, even after careful tightening
- Any need to open walls, move plumbing, or add new shutoff valves (this often requires permits under Miami-Dade rules)
A local plumber who works every day in Miami and Miami Beach bathrooms can also spot bigger issues while you focus on the faucet. For example, a slow drip might point to high water pressure, a hidden slab leak, or failing cast iron waste lines under an older Miami home. That is where services like professional leak detection, drain cleaning, and emergency plumbing come in. Getting those problems caught early saves headaches during hurricane season or heavy rains, when your plumbing is already under stress.
How to install a bathroom sink faucet yourself
- Confirm the faucet matches your sink. Measure the existing faucet holes and buy a compatible single-hole, 4 inch centerset, or 8 inch widespread faucet with a matching drain assembly.
- Turn off water and clear the cabinet. Close the hot and cold shutoff valves, open the faucet to relieve pressure, then remove everything from under the sink and place a bucket and towels.
- Disconnect supply lines and drain. Use a wrench to disconnect flexible supply lines from the shutoff valves and loosen the P-trap and drain connections if you are replacing the drain.
- Remove the old faucet and clean the sink. Loosen the mounting nuts with a basin wrench, lift out the old faucet and drain, then scrape off old putty and clean the faucet and drain areas thoroughly.
- Set and fasten the new faucet. Place the gasket or sealant and faucet on the sink, then tighten the mounting hardware from below until the faucet is solid and properly aligned.
- Install the new drain and reconnect trap. Insert the new drain body with its gasket or putty, align it, tighten the drain nut, reconnect the P-trap, and hook up the stopper and lift rod.
- Attach supply lines and test for leaks. Connect flexible lines to the faucet and shutoff valves, open the valves slowly, run water, test the stopper and drain, and inspect all joints carefully for leaks.
If any step involves gas, electrical wiring, sewage or opening a wall, stop and call a licensed pro at (305) 614-5173.