
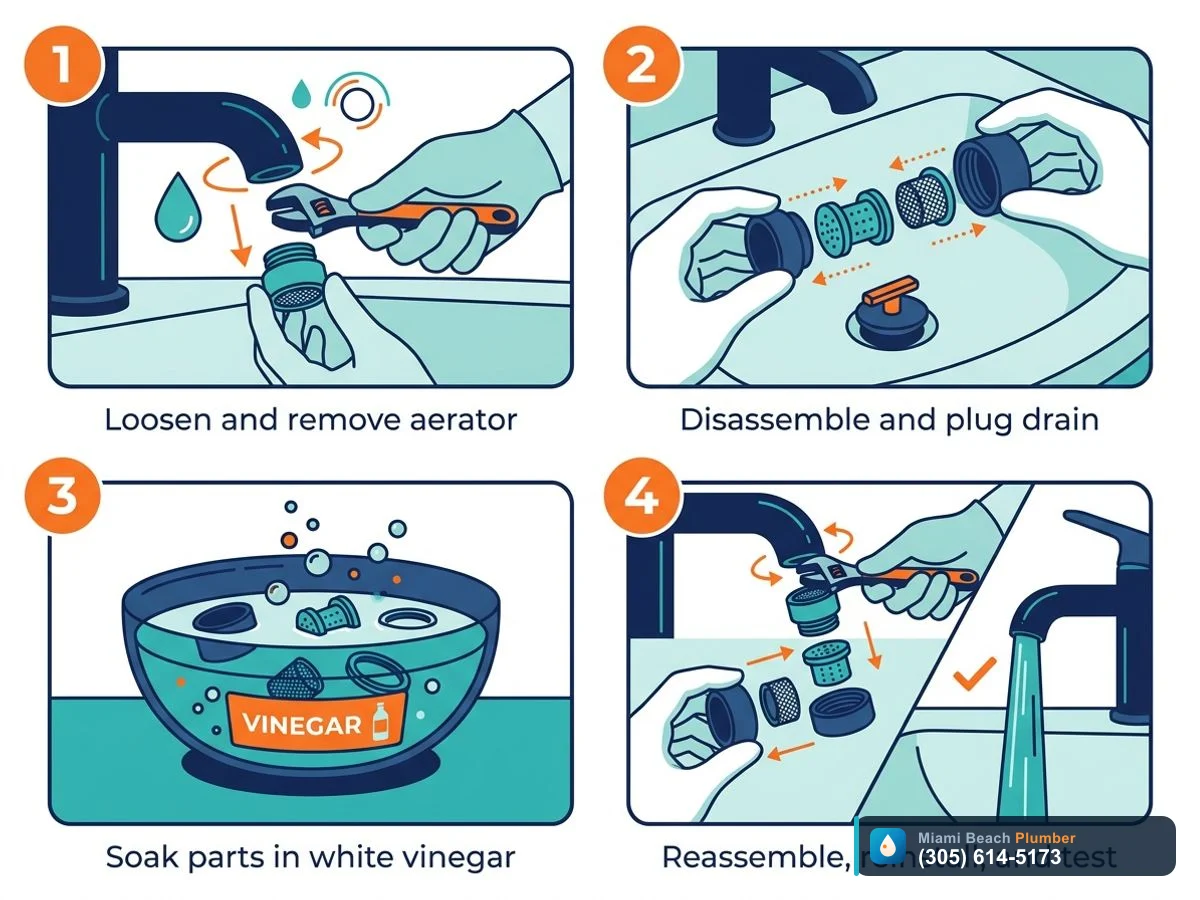
To clean a faucet aerator, unscrew it from the tip of the faucet, disassemble the parts, and soak them in white vinegar for 30 to 60 minutes to dissolve mineral buildup. Scrub gently with a toothbrush, rinse thoroughly, reassemble, and screw it back on. Test flow and check for leaks.
Low water pressure at a bathroom or kitchen sink, especially in Miami and Miami Beach, is often caused by a clogged faucet aerator filled with sand, rust, or hard water scale. The good news is that cleaning it is usually a safe, fast DIY job.

What a faucet aerator does and why it clogs in Miami-Dade
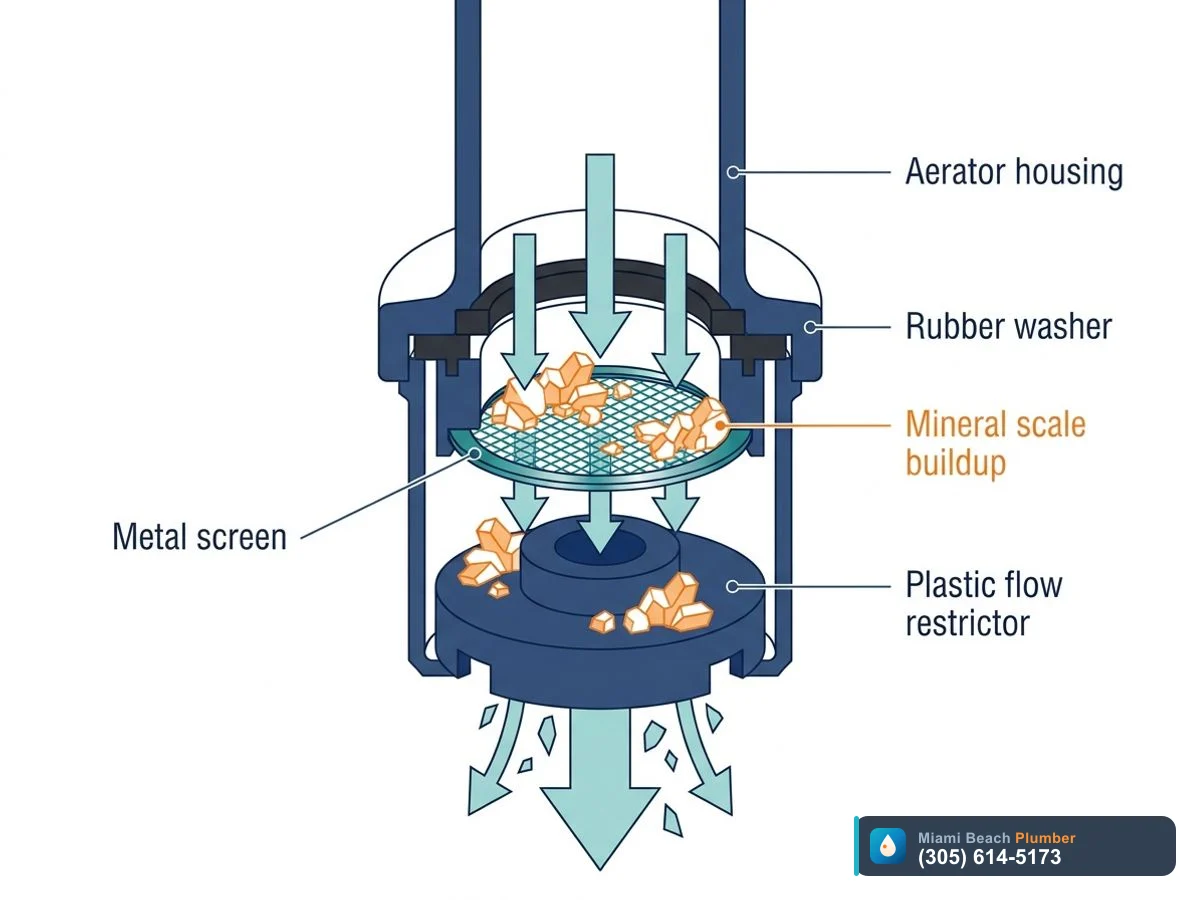
If you are dealing with low water pressure at a single sink, a crooked spray, or water shooting sideways, the faucet aerator is the first thing to check. The aerator is the small screen assembly at the tip of the faucet spout. It mixes air into the water and filters out debris so you get a smooth, controlled stream instead of a splashy blast.
In Miami, Miami Beach, and across Miami-Dade, aerators clog faster than many homeowners expect. City water here is usually hard, around 180 to 210 ppm. That means calcium and lime deposits build up on the small screens and internal parts. On top of that, older galvanized or cast iron pipes, condo risers, and occasional utility work can send sand, rust flakes, and tiny pebbles straight to your aerator.
So if you are searching for how to clean a faucet aerator or how to clean sink faucet head because your flow dropped overnight, the aerator is the right place to start. Cleaning it is usually safe to do yourself and often fixes low pressure without touching any walls or pipes.
How to tell if your faucet aerator is the problem
Before you grab tools, it helps to confirm that the aerator is actually causing the low water pressure. A few quick checks can save you digging into the wrong problem.
- Low pressure at one faucet only. If just one sink has a weak stream but other fixtures in the home or condo are strong, the aerator on that faucet is a prime suspect.
- Spray pattern looks crooked or irregular. Water should come out in a uniform cone. If it is spraying sideways, splitting into multiple streams, or misting, the internal screen is likely partially blocked.
- Visible debris on the screen. Look right at the tip of the spout. If you can see sand, bits of white scale, or trapped hair or thread on the screen, the aerator needs cleaning.
- Sudden change after city or building work. After a water shutoff, line flushing, or work inside a Miami Beach high-rise, it is common for debris to clog aerators in units as lines are turned back on.
Here is a simple way to separate aerator issues from bigger plumbing or building problems:
| Symptom | Likely Cause | What To Do First |
|---|---|---|
| Low pressure at one sink only | Clogged faucet aerator | Remove faucet aerator and clean it |
| Low pressure at multiple sinks, hot and cold | Building or main supply issue, or whole-house pressure problem | Call building management or a licensed plumber |
| Low pressure on hot side only | Water heater or hot line restriction | Check other hot fixtures, then call for water heater inspection |
| Good pressure but spray is crooked or splashing | Partially clogged or damaged aerator | Clean or replace faucet aerator |
How to remove a faucet aerator without damaging your fixture
The most stressful part of learning how to clean a faucet aerator is usually figuring out how to remove the faucet aerator without scratching the finish. Different faucets in Miami condos, hotels, and homes use different styles, so take a minute to identify what you have.
Most modern faucets use one of two types:
- External threaded aerator. You can see a round metal ring at the very tip of the faucet. The threads are on the outside. This kind usually unscrews counterclockwise by hand or with pliers.
- Hidden (cache) aerator. The faucet tip looks smooth with no obvious ring. The aerator is recessed inside and usually needs a special plastic key or a small tool from the faucet manufacturer to remove.
To remove a standard external aerator:
- Turn off the faucet handles so there is no pressure on the aerator.
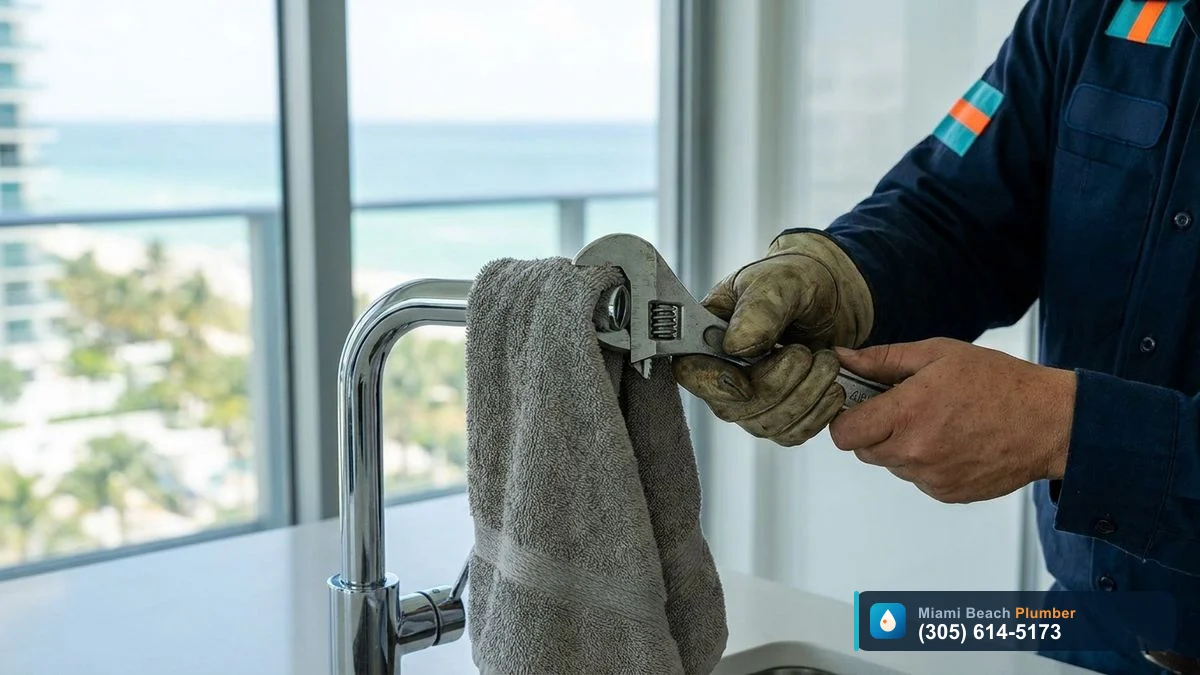
- Wrap the aerator housing with a layer of painter's tape or a small rag to protect the chrome or brushed nickel finish.
- Try loosening by hand first. Grip the ring at the tip of the spout and turn counterclockwise.
- If it does not move, use adjustable pliers or a small wrench over the taped area and gently turn counterclockwise. Go slow to avoid crushing the housing.
For hidden or cache aerators that sit up inside the spout, look under the spout for a small hex or two flat edges. Many kitchen and bathroom faucets include a plastic removal key in the box. If you do not have it, the manufacturer can usually send or sell a replacement.
Some older aerators in Miami-Dade, especially on corroded cast iron or galvanized lines, may be stuck with scale. If the aerator will not budge with moderate hand pressure and light use of pliers, do not force it until metal bends. At that point it is safer to have a licensed plumber remove and replace it to avoid cracking the faucet body.
Step-by-step: how to clean a faucet aerator with hard water buildup
Once the aerator is off the faucet, you can fully clean it and remove hard water deposits. This is the heart of how to clean sink faucet head internals and restore flow.
- Plug the sink drain. Use a drain plug or even a rag. The internal parts of an aerator are small and easy to lose down the drain.
- Disassemble the aerator. Inside the metal housing you will usually find a rubber washer or O-ring, one or more screens, and a small plastic flow regulator. Lay the parts out in order so you can put them back correctly.
- Soak parts in white vinegar. Place the metal and plastic pieces (not the rubber O-ring) in a small bowl of white vinegar for 30 to 60 minutes. Vinegar helps dissolve calcium and lime so you can clean faucet aerator hard water scale without harsh chemicals.
- Gently scrub with a toothbrush. Use an old soft toothbrush to clean all sides of the screens and plastic pieces, paying special attention to the fine mesh where debris collects. Push out sand or grit from the inside out, not the other way around.
- Rinse thoroughly. Rinse all parts under running water to remove loosened scale and vinegar. Check that each hole in the screen is clear and open.
- Clean the faucet threads. While the aerator is off, wipe the inside and outside faucet threads with a cloth or toothbrush. In Miami's hard water, crusty scale often builds up here too.
- Reassemble in the same order. Put the internal parts back into the housing the way you laid them out. Finish by reinstalling the rubber washer or O-ring on top.
If your aerator is heavily corroded, split, or the plastic insert is deformed, replacement is usually better than salvage. Aerators are inexpensive and easy to swap, and a new unit can improve flow and save water at the same time.
For buildings and property managers in Miami-Dade, especially with many units or guest rooms, it can be smart to keep a small stock of standard aerators on hand. Swapping a damaged one is often faster than trying to clean severe scale during a busy day.
How to reinstall and test your cleaned faucet aerator
Reinstalling the cleaned aerator correctly is just as important as cleaning it. Cross-threading or overtightening can damage the faucet spout or cause leaks you might mistake for a bigger plumbing issue.
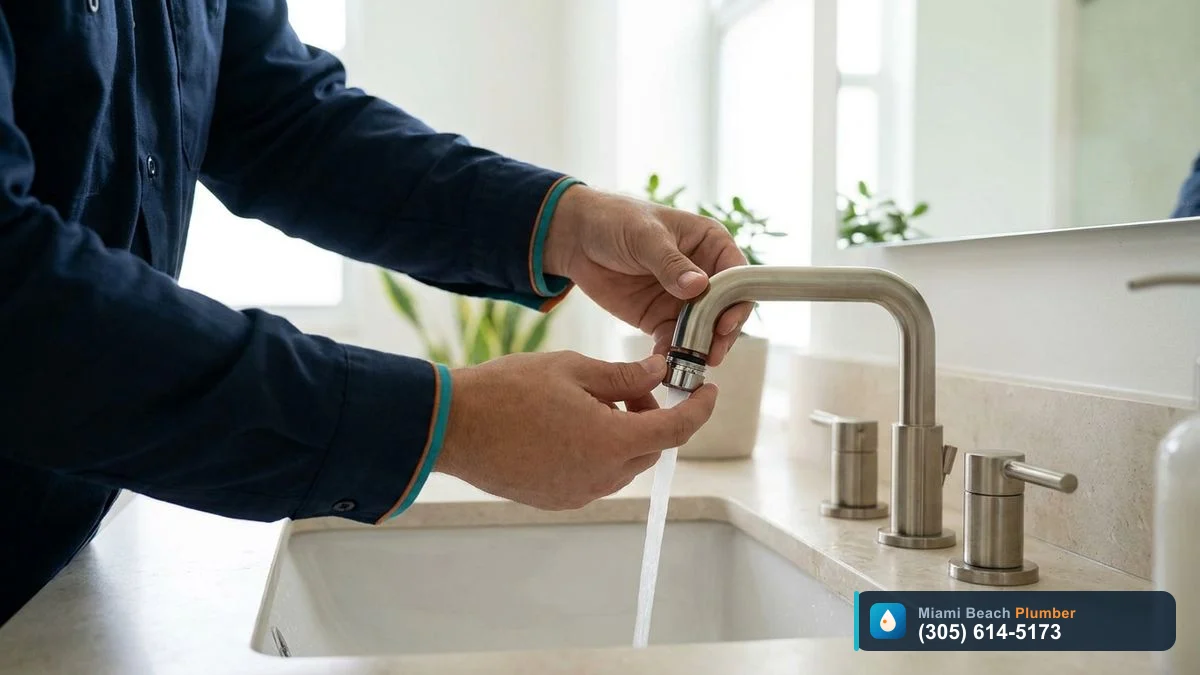
- Hand thread first. Hold the aerator assembly flat against the faucet tip and turn it clockwise by hand. It should start smoothly. If it feels rough or crooked, back off and try again until it spins freely.
- Snug, not muscle-tight. Once it is hand tight, use pliers or a wrench over a piece of tape or cloth to give it a final gentle snug turn. Stop as soon as you feel resistance. The rubber washer inside does the sealing.
- Turn water on slowly. Open the faucet halfway first. Watch for drips around the sides of the aerator while the water runs.
- Check spray pattern and pressure. You should see an even, round flow with better pressure than before cleaning. Switch between hot and cold to confirm both sides are flowing correctly.
If you see water leaking around the outside of the aerator, remove it, check that the rubber washer is seated properly and not cracked, then reinstall. A worn washer is a few dollars to replace and can stop a persistent drip at the faucet tip.
After everything looks good, remove the drain plug so the sink drains normally. Keep the small bowl, toothbrush, and a little vinegar handy. In Miami's hard water, cleaning aerators every 6 to 12 months is a smart maintenance habit.
How often to clean faucet aerators in Miami-Dade and when to call a pro
In softer water areas you might get away with ignoring your aerators for years. In Miami-Dade, that usually backfires. Hard water scale, sand, and rust from older lines and high-rise buildings can clog them quickly.
For most Miami and Miami Beach homes and condos:
- Regular homes and townhomes. Plan to clean faucet aerators every 6 to 12 months, or sooner if you notice any drop in flow or spray quality.
- Condos, hotels, and rentals. High use, plus periodic building line work, means cleaning might be needed every 3 to 6 months. Many property managers add aerator cleaning to their regular preventive maintenance schedule.
- After any plumbing work. If you have had work on your water heater, repiping, or city line repairs, expect debris. Cleaning aerators afterward keeps fixtures from clogging later.
Learning how to clean faucet aerators will fix a lot of low water pressure faucet aerator issues, but not all of them. You should call a licensed plumber if:
- Multiple fixtures have low pressure even after aerator cleaning.
- Only the hot side has low pressure at several faucets, which can indicate water heater or hot line problems.
- You see recurring sand, rust, or black grit in the aerator week after week.
- There is a sudden major drop in pressure after you hear water running in the wall or see damp spots, which could be a hidden leak.
Miami Beach Plumber helps homeowners, condo owners, and property managers across Miami-Dade with these bigger issues every day, including leak detection, drain cleaning, and water heater repair. Cleaning an aerator is a good first step. If it does not solve the problem, it is time to investigate the system behind the fixture.
Preventing future clogs and protecting fixtures in Miami’s hard water
Once you have taken the time to clean faucet aerators, it makes sense to stretch out the results. Miami’s combination of hard water, humidity, and salt air is tough on fixtures, but a few habits can keep your sink faucet heads cleaner for longer.
- Flush new or disturbed lines. After a water shutoff, building work, or a new fixture installation, briefly remove the aerator, then run the faucet for 15 to 30 seconds to flush out any debris. Then reinstall the aerator. This simple trick prevents immediate clogs.
- Wipe and dry the faucet tip. After heavy use, especially in kitchens, wipe the faucet spout tip with a cloth. This reduces mineral spotting and slows buildup at the aerator face.
- Use a pre-filter if you have visible debris. In some older Miami-Dade neighborhoods or buildings, you may see repeated sand or rust. A simple whole-unit or point-of-entry sediment filter can take the load off your aerators and appliances.
- Consider water conditioning. If you are constantly battling scale on fixtures, shower doors, and in your water heater, a licensed plumber can go over water softening or conditioning options suitable for your type of home or condo and local Miami-Dade rules.
Remember, a clogged aerator can also be an early warning sign of other issues. If you repeatedly pull out a screen packed with rust flakes, scale, or black particles, it may be time to look deeper at aging galvanized or cast iron lines, or at the condition of the water heater. A quick call to a licensed, insured local plumber can help decide whether it is a simple maintenance item or part of a bigger pattern.
How to clean a faucet aerator safely at home
- Gather basic tools and materials. You will need adjustable pliers or a small wrench, painter’s tape or a rag to protect the faucet finish, a small bowl, white vinegar, and an old toothbrush or soft brush.
- Identify your aerator type. Check if your faucet has a visible external threaded aerator ring or a hidden (cache) aerator that sits recessed inside the spout so you can remove it the right way.
- Remove the faucet aerator. Turn off the faucet, wrap the aerator housing with tape or a rag, then unscrew it counterclockwise by hand. If needed, gently use pliers or a wrench without crushing the metal.
- Disassemble and soak the parts. Plug the sink drain, take the aerator apart, and place the metal and plastic pieces (not the rubber washer) in a bowl of white vinegar for 30 to 60 minutes to loosen hard water scale.
- Scrub and rinse thoroughly. Use a soft toothbrush to clean all screens and parts, pushing out debris. Rinse each piece under running water until every opening is clear and free of grit.
- Clean faucet threads and reassemble. Brush or wipe the faucet threads to remove scale. Rebuild the aerator in the same order you took it apart, finishing with the rubber washer or O-ring correctly seated.
- Reinstall and test for leaks and flow. Hand-thread the aerator clockwise onto the faucet, snug lightly with pliers over a rag, then run water to check for leaks and confirm that pressure and spray pattern have improved.
If any step involves gas, electrical wiring, sewage or opening a wall, stop and call a licensed pro at (305) 614-5173.